Setup a Manipulator
Learning Objectives
After completing this tutorial, you will have learned:
- How to import the UR10e robot arm from a URDF file
- How to import the Robotiq 2F-140 gripper from a URDF file
- How to connect the robot arm and gripper manually via GUI
- How to use the Robot Assembler for automated connection
Getting Started
Prerequisites
- Complete Tutorial 5: Rig a Mobile Robot before starting this tutorial
- Python 3 and
pip(used to install thexacropackage) gitinstalled
Estimated Time
Approximately 30 minutes
Overview
In this tutorial, you will import the UR10e robot arm and Robotiq 2F-140 gripper from URDF files and connect them as a single articulation. You will learn two connection methods: manual connection via GUI and automated connection using the Robot Assembler.
Two Methods for URDF Import
Isaac Sim provides two ways to import URDF files:
| Method | Extension Name | Requires ROS 2 | Description |
|---|---|---|---|
| Direct URDF Importer | isaacsim.asset.importer.urdf |
No | Import URDF files directly from the file system |
| ROS 2 URDF Importer | isaacsim.ros2.urdf |
Yes | Fetch URDF from a ROS 2 node and import |
This tutorial uses the Direct URDF Importer, which does not require ROS 2.
If you want to use the ROS 2 URDF Importer
If you have ROS 2 installed, you can also import via File > Import from ROS 2 URDF Node. In that case, publish the URDF with ros2 launch ur_description view_ur.launch.py ur_type:=ur10e and specify the node name robot_state_publisher in Isaac Sim. See the official documentation for details.
Reference Assets
Sample assets bundled with Isaac Sim can be used as references. Access them from the Content tab at the bottom right of the screen:
| Asset | Path | Purpose |
|---|---|---|
| import_manipulator folder | Samples > Rigging > Manipulator > import_manipulator |
Reference URDF files and completed USD files |
| UR10e (completed) | import_manipulator/ur10e/ur/ur.usd |
UR10e reference asset |
| Manual connection (completed) | import_manipulator/ur10e/ur/ur_gripper_manual.usd |
Completed GUI manual connection example |
| Robot Assembler (completed) | import_manipulator/ur10e/ur/ur_gripper.usd |
Completed Robot Assembler connection example |
Using bundled URDF files
URDF files are also bundled in the Isaac Sim installation directory. If you want to skip the XACRO conversion steps, you can use these files directly:
- UR10e URDF:
<Isaac Sim install path>/exts/isaacsim.robot_motion.motion_generation/motion_policy_configs/universal_robots/ur10e/ur10e.urdf - UR10e + Robotiq combined URDF:
<Isaac Sim install path>/standalone_examples/api/isaacsim.robot.manipulators/ur10e/rmpflow/ur10e.urdf(robot arm and gripper pre-assembled)
Step 1: Prepare URDF Files
In this step, you will obtain XACRO files for the UR10e robot arm and Robotiq 2F-140 gripper from GitHub ROS packages, and convert them into URDF files that Isaac Sim can import.
Relationship between XACRO and URDF
XACRO (XML Macro) is a macro language for writing URDF files efficiently. It supports parameterization and file splitting, and is widely adopted in ROS robot packages. Since Isaac Sim's URDF Importer cannot read XACRO files directly, they must be converted to URDF beforehand.
1-1. Install xacro
The xacro package is required for converting XACRO to URDF. It can be installed via pip even without a ROS 2 installation:
1-2. Generate UR10e URDF
Clone the Repository
Clone the official Universal Robots ROS 2 Description package:
git clone https://github.com/UniversalRobots/Universal_Robots_ROS2_Description.git
cd Universal_Robots_ROS2_Description
Replace Package Paths
The $(find ur_description) in the XACRO files uses ROS's package search mechanism. Since ROS 2 is not installed, replace it with the absolute path to the cloned repository:
# Replace $(find ur_description) with the repository's absolute path
sed -i "s|\$(find ur_description)|$(pwd)|g" urdf/ur.urdf.xacro urdf/ur_macro.xacro
What is $(find package_name)?
$(find package_name) is a syntax used in ROS XACRO files that expands to the install path of the specified ROS package. When using XACRO outside a ROS environment, you need to manually replace it with the actual path.
Convert XACRO to URDF
Replace Mesh Paths
The mesh paths in the generated URDF file use the package://ur_description/... format. Convert them to relative paths so that Isaac Sim's URDF Importer can locate the meshes correctly:
After conversion, mesh paths will look like this:
<!-- Before -->
<mesh filename="package://ur_description/meshes/ur10e/visual/base.dae"/>

<!-- After -->
<mesh filename="../meshes/ur10e/visual/base.dae"/>
Verify the conversion
To confirm that urdf/ur10e.urdf was generated correctly, check the mesh paths with:
All paths should start with ../meshes/ur10e/....
1-3. Generate Robotiq 2F-140 URDF
Clone the Repository
Clone the ROS 2 Robotiq gripper package provided by PickNikRobotics:
cd ..  # Return to the parent directory of Universal_Robots_ROS2_Description
git clone https://github.com/PickNikRobotics/ros2_robotiq_gripper.git
cd ros2_robotiq_gripper/robotiq_description
Replace Package Paths
Similar to UR10e, replace $(find robotiq_description) with the repository's absolute path:
sed -i "s|\$(find robotiq_description)|$(pwd)|g" urdf/robotiq_2f_140_gripper.urdf.xacro urdf/robotiq_2f_140_macro.urdf.xacro
Convert XACRO to URDF
Specify include_ros2_control:=false to omit the ROS 2 control interface definitions, which are not needed in Isaac Sim:
Replace Mesh Paths
Pre-converted URDF reference file
If you have trouble with the path changes, a pre-converted URDF file is available in Isaac Sim's Content browser at import_manipulator/robotiq_2f_140_urdf/urdf/robotiq_2f_140.urdf.
Step 2: Import into Isaac Sim
Import the URDF files generated in Step 1 into Isaac Sim.
2-1. Import UR10e
- From the Isaac Sim menu, select File > Import.
- In the file selection dialog, select the
Universal_Robots_ROS2_Description/urdf/ur10e.urdffile generated in Step 1. - The URDF Importer dialog will appear.
- Set the Output Directory to your desired save location (e.g.,
~/Desktop). -
In the Joint Configuration section, configure the following:
- Select Natural Frequency as the configuration method
- Set the Natural Frequency to 300 for all joints
What is Natural Frequency?
Natural Frequency controls the stiffness of joints. Higher values result in stiffer joints. A value of 300 is appropriate for the UR10e joints.
-
Click Import to execute the import.
- Verify that a
ur10edirectory has been generated at the Output Directory location, containingur10e.usd.

2-2. Import Robotiq 2F-140
- From the Isaac Sim menu, select File > New to open a new stage.
- Select File > Import and choose
ros2_robotiq_gripper/robotiq_description/urdf/robotiq_2f_140.urdf. - Set the Output Directory to your desired save location (e.g.,
~/Desktop). -
In the Joint Configuration section, verify and configure the following:
- Confirm that the Ignore Mimic checkbox is unchecked (default)
- Select Natural Frequency as the configuration method
- Set the Natural Frequency to 300 for finger_joint
- Set the Natural Frequency to 2500 for all other joints
Check all joints
Some joints may not be visible in the Joint Configuration section, so scroll down and verify that the Natural Frequency has been set for all joints including the last one.
Automatic Mimic Joint Recognition
The Direct URDF Importer automatically reads
<mimic>tags from the URDF. Mimic joints (joints that follow finger_joint) will have their Target Type automatically set to "Mimic". Reference Joint and gear ratio settings are automatically extracted from the URDF, so no manual configuration is needed.What are Mimic Joints?
Mimic joints are joints that move in sync with a reference joint (in this case, finger_joint). They enable the gripper's multiple finger links to open and close in coordination.
-
Click Import to execute the import.

Reference: Robotiq 2F-140 Joint Structure
The imported gripper has the following joint structure:
| Joint Name | Type | Mimic | Role |
|---|---|---|---|
| finger_joint | revolute | — | Main finger joint (driven) |
| left_inner_knuckle_joint | revolute | finger_joint × -1 | Left inner knuckle |
| left_inner_finger_joint | revolute | finger_joint × 1 | Left inner finger |
| right_outer_knuckle_joint | revolute | finger_joint × -1 | Right outer knuckle |
| right_inner_knuckle_joint | revolute | finger_joint × -1 | Right inner knuckle |
| right_inner_finger_joint | revolute | finger_joint × 1 | Right inner finger |
Step 3: Connect UR10e and Robotiq 2F-140
This is the main part of the tutorial. You will connect the two imported robots as a single articulation. Two methods are presented below; choose either one.
Option 1: Manual GUI Connection
This method manually connects the gripper to the robot arm's end effector via GUI. Recommended if you want a deeper understanding of the mechanism.
3-1-1. Load USD Files
- Open the UR10e USD file (
ur10e.usd) in Isaac Sim. - Drag and drop
robotiq_2f_140.usdinto the stage from the Content browser or file explorer.
3-1-2. Position the Gripper
- Select the added
robotiq_2f_140prim in the Stage tree. - Rename it to ee_link (right-click > Rename).
-
In the Property tab, set the following transforms:
- Translate:
(1.18425, 0.2907, 0.06085) - Orient:
(-90, 0, -90)
About the transform values
These values are calculated so that the gripper is correctly positioned at the tip of the UR10e wrist link (wrist_3_link).
- Translate:
3-1-3. Remove the Articulation Root
The gripper was imported as an independent articulation, but it needs to be integrated into the UR10e articulation. Therefore, remove the articulation root from the gripper side.
- Select
ee_link/root_jointin the Stage tree. - Find the Physics Articulation Root section in the Property tab.
- Remove the Articulation Root.
3-1-4. Connect the Joint
- Continue with the Property tab of
ee_link/root_joint. -
In the Joints section, set Body0 to
/ur10e/wrist_3_link.This creates a fixed connection between the gripper's root joint and the UR10e wrist link.
3-1-5. Update Robot Schema
Add the gripper's links and joints to the UR10e robot definition.
- Select the
ur10eprim in the Stage tree. - In the Property tab under IsaacRobotAPI, set the following:
- Add
/ur10e/ee_linkto the isaac:physics:robotjoints field - Add
/ur10e/ee_linkto the isaac:physics:robotLinks field
- Add

Option 2: Robot Assembler Connection
This method uses the Robot Assembler tool for automated connection. It is more efficient and also provides end effector variant management.
3-2-1. Load USD Files
- Open the UR10e USD file (
ur10e.usd) in Isaac Sim. - Drag and drop
robotiq_2f_140.usdinto the stage from the Content browser or file explorer. - Rename the added
robotiq_2f_140prim to ee_link in the Stage tree.
3-2-2. Open Robot Assembler
From the Isaac Sim menu, open Tools > Robotics > Asset Editors > Robot Assembler.
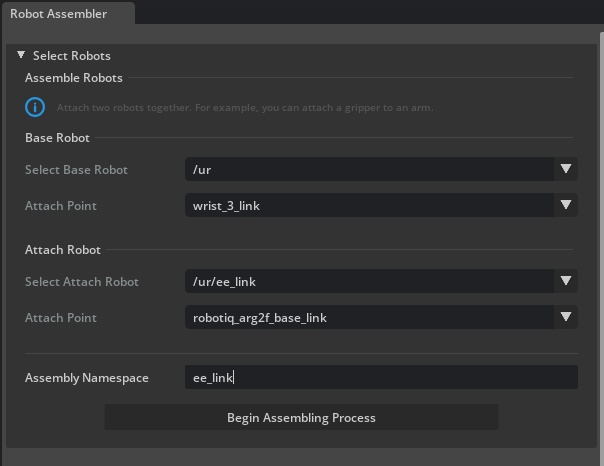
3-2-3. Configure Assembly
Set the following in the Robot Assembler panel:
| Setting | Value | Description |
|---|---|---|
| Base Robot > Select Base Robot | /ur10e |
The base robot arm |
| Base Robot > Attach Point | wrist_3_link |
Connection point (wrist link) |
| Attach Robot > Select Attach Robot | /ur10e/ee_link |
The gripper to connect |
| Attach Robot > Attach Point | robotiq_arg2f_base_link |
Gripper's base link |
| Assembly Namespace | ee_link |
Namespace specification |

3-2-4. Execute Assembly
- Click Begin Assembling Process to start the assembly process.
- Adjust the gripper orientation: click the Z +90 button to rotate the gripper 90 degrees around the Z axis.
- Click Assemble and Simulate to test the connection in simulation.
- If everything looks correct, click End Simulation And Finish to complete the assembly.
3-2-5. Verify Variant Functionality
When connected via the Robot Assembler, end effector variant (switching) functionality is automatically configured. This allows you to easily toggle the gripper on and off during simulation.
- Select the
ur10eprim in the Stage tree. - Check the Variants section in the Property tab:
- Select None next to ee_link → the gripper becomes hidden

- Select robotiq_2f_140 next to ee_link → the gripper becomes visible

- Select None next to ee_link → the gripper becomes hidden
Using the variant feature
The variant feature allows you to easily switch between different end effectors (grippers, suction pads, tools, etc.) for comparative testing.
Step 4: Verify Operation
After the connection is complete, verify the operation in simulation.
- Press the Play button to start simulation.
- Verify that the robot arm and gripper operate as a single unit.
- Confirm that the gripper does not detach from the robot arm or exhibit unnatural movement.
- Save the asset by going to File > Save As.

Simulation Notes
- If the robot "explodes" (parts fly apart), it may be caused by collision mesh interference.
- Verify that the articulation root is configured correctly (for manual connection, ensure that the gripper's articulation root has been removed).
Summary
This tutorial covered the following topics:
- Obtaining XACRO from GitHub ROS packages and converting to URDF: replacing
$(find ...)andpackage://paths, conversion using thexacrocommand - Importing into Isaac Sim using the Direct URDF Importer (no ROS 2 required)
- Manual GUI connection: transform settings, articulation root removal, joint connection, schema update
- Automated connection via Robot Assembler: attach point settings, orientation adjustment, variant management
Reference assets
Completed assets can be found in the Content browser under Samples > Rigging > Manipulator > import_manipulator. The manual connection version is ur_gripper_manual.usd, and the Robot Assembler version is ur_gripper.usd.
Next Steps
Proceed to the next tutorial, "Configure a Manipulator", to learn how to tune physics properties and joint drive gains.