Assemble a Simple Robot
Learning Objectives
After completing this tutorial, you will have learned:
- How to add and manipulate basic shapes on the stage
- How to enable physics properties on objects
- How to examine collision properties
- How to edit physics properties such as friction
- How to edit material properties such as color and reflectivity
Getting Started
Prerequisites
- Complete Tutorial 1: Stage Setup before starting this tutorial.
Estimated Time
Approximately 15-20 minutes.
Overview
In this tutorial, you will use GUI operations to build the basic structure of a simple two-wheeled robot using primitive shapes (cubes, cylinders). You will create the robot body and two wheels, then learn how to configure physics properties, examine collision meshes, and apply materials.
Preparation
- Create a new Stage from the menu bar via File > New.
- Generate a ground plane via Create > Physics > Ground Plane from the menu bar.
Adding Objects to the Scene
Creating the Robot Body
- Right-click on the stage and select Create > Xform.
- Right-click the created Xform and select Rename, then rename it to body.
- In the Property panel, set Transform > Translate to (0, 0, 1).
- Click Create > Shape > Cube from the menu bar to create a cube.
- In the Property panel, set Transform > Translate to (0, 0, 1).
- In the Property panel, set Transform > Scale to (2, 1, 0.5).
- Drag and drop the cube into the body Xform to make it a child element.

Creating the Wheels
- Right-click on the stage and select Create > Xform. In the Property panel, set Translate to (0, 1.5, 1) and Orient to (90, 0, 0).
- Rename it to wheel_left.
- Right-click wheel_left on the stage, then click Create > Shape > Cylinder to create a cylinder.
- Scroll down to the Geometry section in the Property panel.
- Change Radius to 0.5 and Height to 1.0.
- Rename the cylinder to wheel_left.
- Right-click the wheel_left Xform and select Duplicate.
- Move the duplicated wheel's Translate y value to -1.5.
- Rename the duplicated Xform to wheel_right.
-
Rename the duplicated cylinder to wheel_right.

Adding Physics Properties
Applying Rigid Body Physics
- Select the cube and both cylinders using Ctrl+Shift or Shift keys.
- Click the + Add button in the Property tab.
- Select Physics > Rigid Body with Colliders Preset.
- Press Play to verify that the objects fall to the ground.
About Rigid Body with Colliders Preset
Selecting "Rigid Body with Colliders Preset" automatically applies both the Rigid Body API (gravity and simulation dynamics) and the Collision API (collision detection).

Examining Collision Meshes
- Click the
 at the top of the viewport.
 - Select Show By Type > Physics > Colliders > All.
-
Purple outlines appear around static objects with the Collision API applied (in this case, the ground plane). Green outlines appear around dynamic objects (in this case, the cube and two cylinders).

Adding Contact and Friction Parameters
- From the menu bar, click Create > Physics > Physics Material.
- Select Rigid Body Material in the popup.
- Tune parameters such as friction coefficients and restitution in the Property tab.
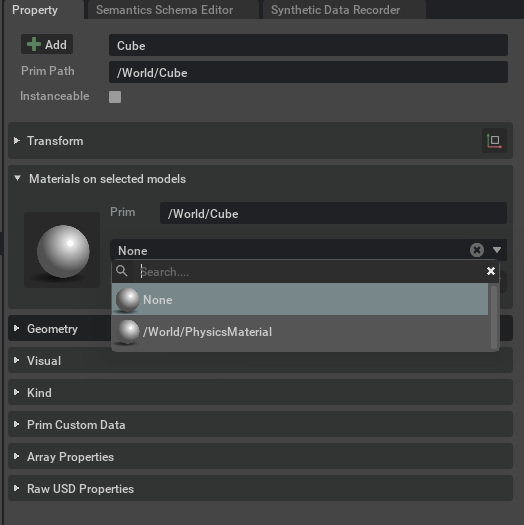
- Select an object in the stage tree.
- Find physics materials on selected models in the Property > Physics tab.
-
Select the desired material from the dropdown menu to assign it.
Setting Material Properties
Creating and Assigning Visual Materials
- Click Create > Materials > OmniPBR from the menu bar three times to create three materials.
- Right-click the newly created materials and rename them to ground, body, and wheel respectively.
- Select the body material and change the Albedo Color to RGB: (0.1, 1.0, 0.1) in the Material and Shader / Albedo section of the Property tab.
- Adjust reflectivity, roughness, and other properties as needed.
- Select the wheel material and change the Albedo Color to RGB: (0.1, 0.1, 1.0) in the Material and Shader / Albedo section of the Property tab.
- Adjust reflectivity, roughness, and other properties as needed.
- Select the GroundPlane Xform and assign the ground material from Materials on selected models in the Property tab.
- Select the body Xform and assign the body material from Materials on selected models in the Property tab.
- Select the wheel_left Xform and assign the wheel material from Materials on selected models in the Property tab.
- Select the wheel_right Xform and assign the wheel material from Materials on selected models in the Property tab.
-
Verify that color changes appear on the corresponding robot parts.

Summary
This tutorial covered the following topics:
- Building a robot structure using primitive shapes (Cube, Cylinder)
- Configuring physics with Rigid Body with Colliders Preset
- Visualizing and examining collision meshes
- Setting friction and restitution with Physics Material
- Configuring visual appearance with OmniPBR materials
Reference Asset
The completed robot is similar to the mock_robot_no_joints asset found in the Samples > Rigging > MockRobot folder in the Content tab at the bottom right of the screen.
Next Steps
Proceed to the next tutorial, "Articulate a Basic Robot", to learn how to configure joints and articulations.